|
Syntax:
dispcellall(cellList,images)
dispcellall(cellList,images,framelist)
dispcellall(cellList,images,...,spotfieldname)
dispcellall(cellList,images,...,spotfieldname1,spotfieldname2,spotfieldname3)
dispcellall(cellList,images,...,signalfieldname)
dispcellall(cellList,images,...,'numbers')
dispcellall(cellList,images,...,'disk')
dispcellall(cellList,images,...,'circle')
This function displays a microscope image with the cells detected on this
image and spots inside (if present). The cells and the spots to be displayed
can be filtered using several criteria.
-
<cellList> - an array that contains the meshes and spots. This
function can use either a cellList array generated by the
SpotFinderZ,
SpotFinderM and
peakfinder functions, or a spotList array
generated by the SpotFinderF function. You
can drag-and-drop the file with the data into MATLAB workspace or open it
using the MATLAB Import Tool.
-
<images> - a 3D array of images. It can be obtained using
loadimageseries and
loadimagestack commands, e.g.:
images=loadimageseries('c:\users\test\imagefiles',1);.
To not display images (and show black backgroung instead), use an empty array,
[].
-
<framelist> - list of frames to display, i.e. [1 3 4 10] to display
frames 1, 3, 4, and 10. Default: all frames.
-
<spotfieldname>, <spotfieldname1>, ... - names of the fields
containing spots, must start with 'spots', e.g. 'spots', 'spots1', 'spots2',
etc. Several fields can be listed. Only the first one is used for filtering
cells. Default: 'spots'. To not display spots, use a non-existent field name,
e.g. 'spotsx'.
-
<signalfieldname> - name of the field containing signal (for
filtering). It must start with 'signal', e.g. 'signal1', 'signal2', etc.
Default: 'signal1'.
-
'numbers' - use this option to display the numbers inside cells.
-
'disk' - display spots as filled disks rather than dots. The radius in this
case is measured in image pixels, not screen points.
-
'circle' - display spots as circles rather than dots. The radius in this
case is measured in image pixels, not screen points.
The rest of the parameters must be submitted in the format
<parametername>,<parametervalue>, where <parametername> must
be in quotes and <parametervalue> must be the value of this parameter. For
example: dispcellall(cellList,images,cell,'markersize',2). Here are the possible
parameters:
- 'markersize' - spots marker size, 0 - don't show, default automatic.
- 'imagelimits' - image scaling limits, default max to min.
- 'colortable' - nx3 table of the marker disk colors. The table is an
n-by-3 or n+1-by-3 matrix, where n if the number of fields. Each row
corresponds to the color of the field, in the RGB (red, green, blue)
format, the optional extra row corresponds to the color of
overlapping regions.
Filtering parameters: only cells/spots satisfying them will be displayed. If
no spot exists in the cell or should be displayed and any of the spot filters is
used, the cell will only be displayed if 'nspots' parameter is present and
contains zero.
- 'cellintensity' - array of two numbers: low and high limits of the total
intensity in the cell (as written in the mesh - either
<spotfieldname> field or, if not provided, 'signal1' field)
- 'cellmeanintensity' - mean intensity in the cell
- 'celllength' - low and high limits of the cell length (in pixels)
- 'cellarea' - low and high limits of the cell area (in pixels squared)
- 'cellvolume' - low and high limits of the cell volume (in pixels cubic)
- 'cellmeanwidth' - low and high limits of the mean (along the length)
width of the cell
- 'cellmaxwidth' - low and high limits of the maximum width of the cell
- 'cellcurvature' - low and high limits of the cell curvature (in 1/pixel)
- 'nspots' - list of possible numbers of spots (e.g. 0:3 for up to 3 spots)
- 'spotmagnitude' - low and high limits of the spot magnitude
- 'spotheight' - low and high limits of the spot height (intensity units)
- 'spotwidth' - low and high limits of the spot width (in pixels)
- 'spotposition' - low and high limits of the spot position from the "old"
pole of the cell. This parameter allows more than 2 limits, in which
case the spot will be displayed if it is either between 1st and 2nd,
or 3rd and 4th, etc.
- 'spotrelposition' - low and high limits of the relative (between 0 and 1)
spot position, measured from the "lod" pole. This parameter also
allows more than two limits.
Example
This example demonstrates how to use some of the display options of the
dispspotall command. It uses images of C. crescentus CB15N cells expressing
CFP-ParB and PopZ-YFP chimeric proteins (courtesy of Dr. Geraldine Laloux).
1. Start MATLAB. Set the working path in MATLAB to the folder of the
example: ...\MicrobeTracker...\examples\spotfinder2.
2. Load the cb15nparbpopz.mat file by dragging-
and-dropping it into the MATLAB's workspace.
If you with, you can obtain this file yourself. For this, start
MicrobeTracker. Load the
default parameter set alg4.set. Load the phase
contrast image by checking the Stack checkbox, then clicking on the
Load phase button and selecting the
...\cb15nparbpopz\phase.tif file. Click the All
frames to do detection. Save the resulting file on the disk. Close
MicrobeTracker and start SpotFinderZ. Run
Adjust regime, load the ...\cb15nparbpopz\cfp.tif
file and go through several cells selecting the right spots,
then click Stop. Select checkboxes Meshes and File, then
click Run selecting the input and output file. Repeat the same procedure
for the ...\cb15nparbpopz\yfp.tif with loading the
meshes file just generated by SpotFinderZ, except for changing the
Field value to "spots2" (this will create different fields for CFP anf
YFP spots). Save to the same file. Close SpotFinderZ and load the file into
MATLAB's workspace.
3. Load the images we will need using the
loadimagestack function.
cfp=loadimagestack('cb15parbpopz\cfp.tif');
yfp=loadimagestack('cb15parbpopz\yfp.tif');
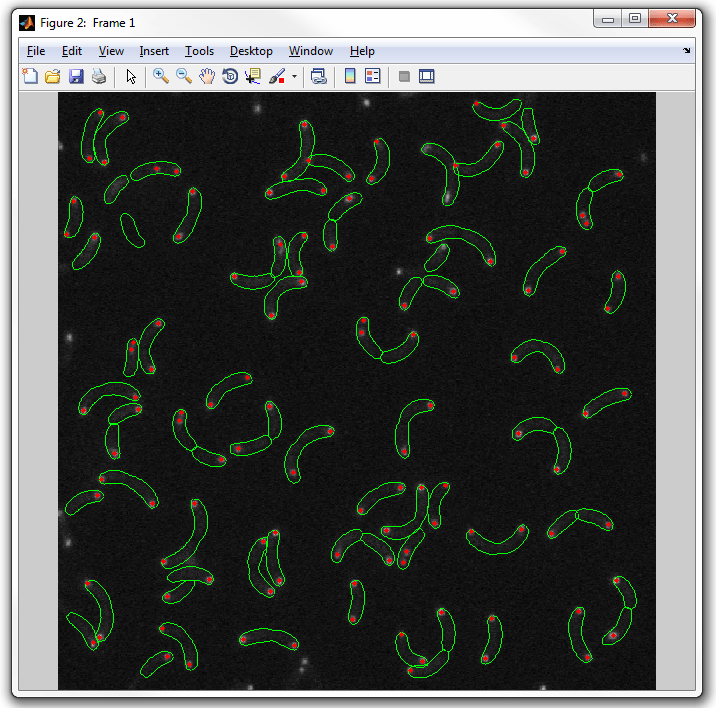
4. Now run the dispcellall function with the default parameters to display
the CFP spots overlaying the corresponding image:
dispcellall(cellList,cfp)
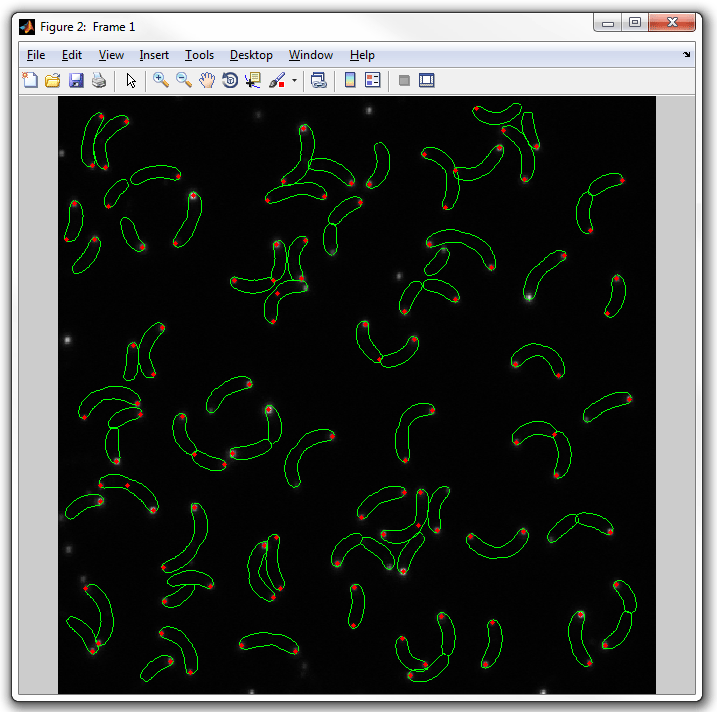
5. To display the YFP spots change the field to display from the default "spots"
to "spots2":
dispcellall(cellList,yfp,'spots2')
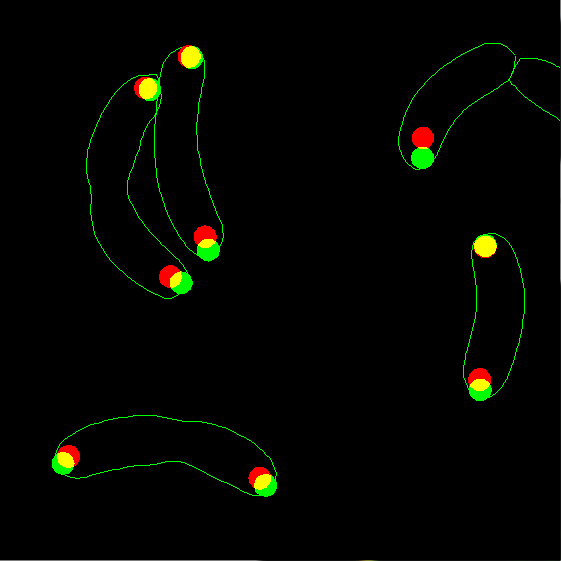
6. Now display the two types of spots together without any background image:
dispcellall(cellList,[],'spots','spots2')

7. Now display the two types of spots together, but using filled circles
instead of dots. This regime is useful to see overlapping spots. Let's also
change the radius of the spots from the default of 1.5 pixels to 2.5 pixels.
Zoom the image after plotting to see the details better:
dispcellall(cellList,[],'spots','spots2','disk','markersize',2.5)
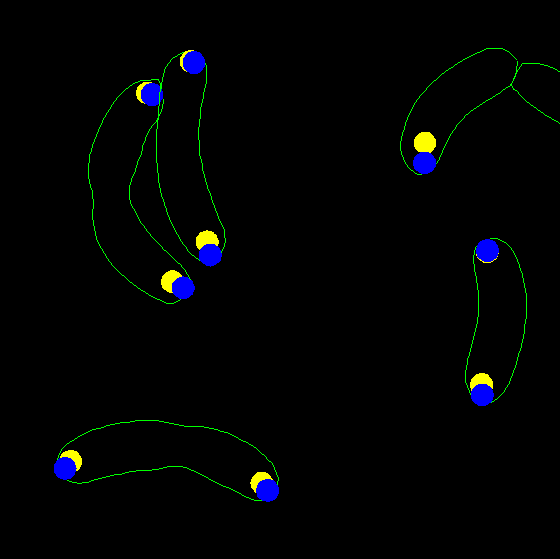
8. The way disks are displayed can be modified by the user by directly
supplying their colors. The color table is an n-by-3 or n+1-by-3
matrix, where n if the number of fields (two in our case - "spots" and
"spots2"). Each row corresponds to the color of the field, in the RGB (red,
green, blue) format e.g. for magenta and blue colors the matrix is:
[1 0 1; 0 0 1]
The optional last row correspond to the merge color if two or more different
spots overlap. Let's display the spots with yellow and blue colors without
merge:
dispcellall(cellList,[],'spots','spots2','disk','markersize',2.5,'colortable',[1 1 0;0 0 1])
|